Blog

Laravel Model Timestamps without an updated_at

Laravel makes it easy to add created_at and updated_at fields to your models. Just include the ->timestamps() shorthand in the migration, and use public $timestamps = true on the model.

Sometimes though you’ll have high-volume models such as an event log that record immutable things that will never be updated. Storing a redundant updated_at can be a bit wasteful if you’ll never need it, and it tells you nothing new.

It’s easy to customise the behaviour, but perhaps a little hard to discover. I missed it in my searching until Jess Archer told me it was supported.

In the migration

Define your migration like so:

<?php
// ...

return new class extends Migration
{
    public function up(): void
    {
        Schema::create('my_table', function(Blueprint $table) {
            $table->smallIncrements('id');
            $table->timestamp('created_at', 0)->nullable();
            // define created_at on its own
        });
    }
}

In the model

By default Laravel will attempt to write to the updated_at column. If you don’t have one it will error.

You can easily disable it like so:

<?php

namespace App\Models;

use Illuminate\Database\Eloquent\Factories\HasFactory;
use Illuminate\Database\Eloquent\Model;

class MyModel extends Model
{
    public $timestamps = true;

    const UPDATED_AT = null;

    //...
}

Done 🙂

Using S3 Lifecycle rules with Spatie Laravel Backups

AWS S3 has a feature called Lifestyle Rules that let you define rules to run a range of transitions on your objects, such as changing their storage class or expiring (deleting) them.

This can be useful to save costs and clean up your object list by removing objects you don’t need to keep forever. You can lean on AWS for the expiry logic without having to program scheduled events to clean up for you.

Lifecyle rules can be targeted to an entire bucket, to objects with a path prefix, or to objects with a particular Tags.

Spatie Laravel Backup is a popular Laravel package for taking site/database backups.

It can be configured to write to various ‘disks’. If you’re using the S3 disk it is possible to Tag those backups for targeting by the Lifecycle rule.

Creating the rules in S3 and targeting a tag

S3 Console screenshot showing Management lifecycle rules

In my case I will be targeting a tag called fadeout with a value of true.

This rule will transition objects to the Standard Infrequent Access storage class after 30 days, and then delete them after 60 days. It also only applies to objects over 150kB.

Tagging backups that Laravel Backup uploads

To have your backup objects tagged in order for the lifecycle rule to take effect you’ll need to an an option to your Laravel fileysystems.php config file.

Assuming you are using the s3 disk, you’ll need to add a backup_options value to your S3 config array like so:

's3' => [
  'driver' => 's3',
  'key' => env('AWS_ACCESS_KEY_ID'),
  'secret' => env('AWS_SECRET_ACCESS_KEY'),
  'region' => env('AWS_DEFAULT_REGION'),
  'bucket' => env('AWS_BUCKET'),
  'url' => env('AWS_URL'),
  'backup_options' =>
     ['Tagging' => 'fadeout=true', 'visibility'=>'private'],
],

Backups are private by default, but because we’re overriding the options array we need to specify it again.
The format of the Tagging key is url encoded as shown.
The Tagging and visibility keys are case sensitive as shown.

With that in place you can keep your recent backups without cluttering your bucket 🙂

Check Australian Business Number (ABN) in PHP and Laravel

ABNs use a checksum, so their basic format can be validated. There is also an API to check that the ABN also corresponds to a real business, but as a preliminary check this function will tell you that the format is correct.

See the rules behind the check here.

<?php

// Remove spaces from an ABN string before passing to function.

function validAbnFormat(int $abn): bool
{
  if (strlen($abn) !== 11) {
    return false;
  }

  $nums = array_map('intval', str_split($abn, 1));
  $nums[0] -= 1;

  $weights = [10, 1, 3, 5, 7, 9, 11, 13, 15, 17, 19];

  foreach($nums as $pos => $num) {
    $weight = $weights[$pos];
    $nums[$pos] = $num * $weight;
  }

  $sum = array_sum($nums);
  return $sum % 89 === 0;
}

Creating a Laravel Validation Rule

If you would like to validate ABNs in a Laravel application you can register a custom validation rule that you can use in Form Requests or Validators.

Create the new rule class using artisan

php artisan make:rule Abn

Then use a variation of the function above to validate the ABN. The Abn class should look like this:

<?php

namespace App\Rules;

use Illuminate\Contracts\Validation\Rule;

class Abn implements Rule
{
    public function __construct() {}

    /**
     * Determine if the validation rule passes.
     *
     * @param  string  $attribute
     * @param  mixed  $value
     * @return bool
     */
    public function passes($attribute, $abn)
    {
        $abn = str_replace(' ', '', $abn);

        if (strlen($abn) !== 11) {
            return false;
        }
        
        $nums = array_map('intval', str_split($abn, 1));
        $nums[0] -= 1;
        
        $weights = [10, 1, 3, 5, 7, 9, 11, 13, 15, 17, 19];
        
        foreach($nums as $pos => $num) {
            $weight = $weights[$pos];
            $nums[$pos] = $num * $weight;
        }
        
        return array_sum($nums) % 89 === 0;
    }

    /**
     * Get the validation error message.
     */
    public function message(): string
    {
        return 'Invalid ABN';
    }
}

You can then use this validation rule by importing the class and adding it to your set of rules for an input.

<?php

use App\Rules\Abn;

// ...

$validator = Validator::make(
   $input->all(),
   ['abn' => ['required', new Abn]]
);

Testing Form Request Validation in Laravel

I recently got stuck writing a test for a Controller which uses a custom form request for validation and authorization. Though the form request worked correctly for real requests in the browser, it was being ignored from the Feature test. In other words the Controller action would run even with invalid test input and even when the form request was hard-coded to specifically block authorization.

Incorrect Approach

I had been creating the form request, instantiating the Controller I wanted to test and sending the request. This bypassed the checks, presumably because the middleware that triggers validation isn’t run in this context.

function test_invalid_request()
{
  $request = CafeStoreRequest::create('cafe', 'POST', ['cafe_name' => '']); //should fail
  $controller = new App\Http\Controllers\CafeController();
  $response = $controller->store($request);

  $response->assertSessionHasErrors(['cafe_name']);
}

What Worked

Instead of manually creating a controller, I needed to route the request through the HTTP layer so that the middleware would do its thing and trigger the appropriate error.

function test_invalid_input()
{
  $response = $this->post(route('cafe.store', ['cafe_name' => '']));
  $response->assertSessionHasErrors(['cafe_name']);
}

Create a Light & Dark Mode Control with Tailwind & Alpine

Some users prefer darker colour themes to prevent eyestrain, while others like having the choice depending on their lighting conditions. Tailwind makes it easy to specify different colours to use depending on which mode is active.

By default Tailwind responds to the prefers-color-scheme media query, which passes through the users’ operating system preference. You can also configure it to alter the colours by inheriting a ‘dark’ CSS class name from a parent element. This lets you to build your own UI control to switch modes, so that users can have a different preference for your site than their OS.

To do this, change the darkMode property in your tailwind.config.js file

// tailwind.config.js

module.exports = {
  //...
  
  darkMode: 'class',
}

Controlling The Active Mode

Now that Tailwind is configured to compile dark mode colours based on the .dark class name, we need a way to toggle that class name. We also need to persist the selection between sessions and page loads.

I’ll be using localStorage to store the user’s preference and AlpineJS to handle the toggling action. Alpine is a lightweight JS framework that works with your markup and doesn’t require a build step.

As well as storing the user’s preference we’ll need to apply it as early as possible during page rendering to activate their desired mode.

How it Works

  • Tailwind generates classes that are applied when dark mode is activated
  • When our page loads we see if the user has set an explicit choice of mode for our site (using the UI control we provide)
  • If they’ve asked for dark mode we apply the CSS class
  • If they have not set a preference, but their implicit preference via their OS is for dark mode we apply the CSS class
  • Otherwise we’ll fall back to the default light mode

When our user makes a specific choice using the on-page UI we’ll update the document class and also save their preference in localStorage for subsequent page loads.
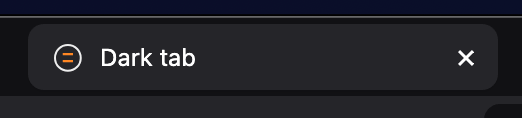
UI Control

Here’s the code to provide light & dark mode buttons. Alpine uses the x-data property to store the state for our component. x-init runs on setup and syncs our local state with what was previously stored in localStorage.

<div
  x-data="{
      mode: '',
      setColorMode: m => {
          if (m === 'dark') {
              document.documentElement.classList.add('dark')
              localStorage.setItem('colorMode', 'dark')
          } else {
              document.documentElement.classList.remove('dark')
              localStorage.setItem('colorMode', 'light')
          }
      }
  }"

  x-init="() => {
      const m = localStorage.getItem('colorMode');
      if (m !== 'dark' && m !== 'light') return;
      mode = m;
  }"
>
  <button
    @click="mode='light'; setColorMode('light');"
    :class="{'font-bold': mode === 'light', 'font-thin': mode !== 'light' }"
    class="underline px-2 py-1 rounded-md border-white hover:bg-gray-100 dark:hover:bg-gray-800"
    >
    light
  </button>
  
  <button
    @click="mode = 'dark'; setColorMode('dark');"
    :class="{'bg-gray-700 text-gray-200 border border-solid border-gray-600 font-bold': mode === 'dark', 'font-thin': mode !== 'dark' }"
    class="underline px-2 py-1 rounded-md hover:bg-white dark:hover:bg-gray-800"
    >
    dark
  </button>
</div>

Persisting The Selection

Of course as users browse around your site you don’t want them to have to re-apply their choice of colour mode every time they visit a new page. We’ll use a bit of JS near the top of our document to reapply their preference as early in the render as possible.

<head>
  <!-- other bits -->
  <link rel="stylesheet" href="css/style.css" type="text/css">
  <script src="detect-mode.js"></script>
</head>
// detect-mode.js
// set initial color scheme

let explicitelyPreferScheme = false
if (window.localStorage) {
    if (localStorage.getItem('colorMode') === 'dark') {
        document.documentElement.classList.add('dark')
        explicitelyPreferScheme = 'dark'
    } else if (localStorage.getItem('colorMode') === 'light') {
        document.documentElement.classList.remove('dark')
        explicitelyPreferScheme = 'light'
    }
}

if (explicitelyPreferScheme !== 'light' && window.matchMedia('(prefers-color-scheme:dark)').matches) {
    document.documentElement.classList.add('dark')
}

This will apply dark mode if our visitor has selected it from the UI control above; or if they have not set any preference but their OS is set to use dark mode.

Live Demo

You can change your preference and reload this page to see it persist.

Enjoy the darkness!

Fixing Curl Error 35 with WordPress API calls

I recently had an issue where a WordPress website I was building could not connect to itself for wp-cron or background tasks.

This was the error:

curl: (35) error:1408F10B:SSL routines:ssl3_get_record:wrong version number

It turns out I had a faulty nginx configuation, and the server block was missing the ssl directive. The certificates worked in both Chrome and Firefox without warnings, but they weren’t doing what the needed to for curl to work.

server {
	listen 443 ssl;
	server_name www.example.com;
	
	root /var/www/example/;
}

Adding ssl to the listen line fixed the cURL error and wp-cron

Confirm Before Deleting WordPress Trash

I recently watched someone who using their phone and tablet for everything manage posts on their WordPress blog. One they intended to keep ended up in the Trash by mistake. Restoring it is easy enough, but the ‘Restore’ and ‘Delete Permanently’ links are very close to each other on a mobile screen and I got a little nervous seeing them tap restore 30px away from the kill button.

I’ve created a simple WordPress plugin that adds a confirmation step in the admin area before deleting or emptying the Trash.

It’s a pretty simple thing, just a little JavaScript to make sure the click was deliberate. Give it a go if you’d rather have an extra click than possibly try and recover a post from a site backup.

Download the Plugin

Trash Fail Safe for WordPress.

Deleting with Axios and Laravel

With a RESTful Controller you will typically have methods to show, list, update, edit and destroy (delete) the entity in question. The controller methods map to HTTP methods (verbs) such as GET, POST, PUT and DELETE.

Not all browsers support all of the HTTP methods. The PUT and DELETE requests might actually be sent as a POST request, but with the _method parameter included to tell Laravel’s routing system what to do with the request. When that hint is present Laravel will use it to determine the type of request, rather than the actual HTTP request method.

If you are making these HTTP requests with Axios then you might find some of the calls are failing with a 405 Method Not Allowed error.

This is due to the way Axios sends POST, PUT and DELETE requests. You may need to actually POST the request and include the _method hint in the request data instead.

Example JavaScript

axios.post('/myentity/839', {
  _method: 'DELETE'
})
.then( response => {
   //handle success
})
.catch( error => {
   //handle failure
})

Save-Data for Low Bandwidth Users

Everyone likes a fast website, but some users have connections and data plans that make it especially critical. Some browsers support a ‘saves-data’ setting which sends an HTTP header along with requests that the server can use to respond with a lighter weight page.

In mobile Chrome this is called ‘Lite Mode’. Desktop browsers can also enable the setting via an extension. Turning the setting on doesn’t necessarily do much on its own, but it does however give the server a chance to make its own aggressive optimisations knowing the user is on board.

To help low-bandwidth users have a good time websites can detect the header and avoid serving unnecessary assets such as custom fonts or background images and videos.

I’ve created a few save-data customisations here on my site. When the WordPress functions.php file detects this setting it doesn’t enqueue the custom fonts stylesheet from Google Fonts. I’m also using slightly different styles to drop the decorative background image from the masthead.

You can see the difference here:

The setting can be detected server-side by looking for a HTTP header (save-data=on) or client side in JS to set a flag for your CSS selectors.

<?php

function saveData(): bool {
   return ( isset($_SERVER["HTTP_SAVE_DATA"]) &&
      strtolower($_SERVER["HTTP_SAVE_DATA"]) === 'on' 
    );
}
//JS example (courtesy of Nooshu)
//add save-data class name to document element for CSS selectors
if ("connection" in navigator) {
    if (navigator.connection.saveData === true) {
        document.documentElement.classList.add('save-data');
    }
}

Exactly what you do with save-data is up to you. Nothing is automatic, so it’s up to the website to determine what can be changed to better serve those users. It just gives you a clear hint at the user’s preference about bandwidth usage.

Enabling Gutenberg for Custom Post Types

Super quick tip here, but probably non-obvious.

If you want to be able to use WordPress’ Gutenberg editor with a Custom Post Type you’ll need to register the post type with REST API support.

<?php
register_post_type('my_post_type', [
    'label' => 'Things',
    'labels' => ['...'],

    'show_in_rest' => true, //required to enable Gutenberg editor
    
]);