Enabling Gutenberg for Custom Post Types

Super quick tip here, but probably non-obvious.

If you want to be able to use WordPress’ Gutenberg editor with a Custom Post Type you’ll need to register the post type with REST API support.

<?php
register_post_type('my_post_type', [
    'label' => 'Things',
    'labels' => ['...'],

    'show_in_rest' => true, //required to enable Gutenberg editor
    
]);

Laravel’s Signed URLs Breaking with Nginx

Laravel includes a feature to sign URLs so that publicly accessible routes can be visited knowing the query string hasn’t been tampered with.

Laravel uses this for email verification links by default. I ran into a problem where signed URLs were always failing (throwing the 403 exception) in my production environment. The same code worked locally.

In turns out that this was a result of the way the package uses query string parameters to build the signature. My production nginx configuration was creating a different parameter signature to what Laravel was expecting. This was fine for unsigned URLs as the routing still worked, but it did mean that the ‘signed’ middleware would always fail.

The solution was just to alter my sites nginx config like this:

# Nope
try_files $uri $uri/ /index.php?q=$uri&$args;

# Yes
try_files $uri $uri/ /index.php?$query_string;

Now Laravel’s request object receives the same query parameters and the signed URL signature will match.

CDNs for Small Websites

Content Delivery Networks (CDN) are typically most useful for sites with a widely dispersed audience, or those with high traffic. They serve static files from locations close to the user for faster response times and alleviate load from the main server. However a CDN can make small websites at the other end of the spectrum a lot faster too!

CDNs for small websites

I recently built a simple one-page website for a client. It’s a minimal online presence to capture searches for their business name, provide some information and a contact form.

In theory even entry-level shared hosting should load a site like this very quickly. In practice it can be like a ballpoint pen – if it hasn’t been used for a while it’s slow to put ink on the page. Once it gets going it’s fine.

Low-traffic small business sites can effectively be ‘put the site at the back of the server’, like the ink that’s dried on the tip of a pen. If the site hasn’t been requested for several hours that first response can be a lot slower than it should be. Subsequent hits might be perfectly quick, but that doesn’t help with the first impression.

I was able to speed up this site considerably by using the traditional cPanel shared host as a CDN Origin, and route the domain through Cloudfront. Cloudfront acts as a fast cache, storing a rendered version of the page (and its supporting files) to respond quickly to sporadic visits.

This retains the flexibility of some basic server side rendering while massively speeding that first page load. The backend functionality required to run the contact form works via an Ajax request to the underlying cPanel server.

For simple sites this approach was a lot easier to develop (read cheaper) than a full static site generation approach, while still giving some scripting capabilities and the speed of a static site deployed to a CDN.

WordPress 5.0 and the Gutenberg High Drama

Considering how widely used and how widely extended WordPress is, it’s renowned for its backwards compatibility with new releases. The next major WordPress update – v5.0 – is due for release in a couple of days amid a shroud of hot drama over the stability of the new Gutenberg editor.

Gutenberg is a major redesign in the way Pages and Posts can be constructed within WordPress. It brings the concept of custom ‘Blocks’ which allow chunks of information to be presented in specific ways. Conceptually this approach has widespread support, but retrofitting it into the existing WordPress ecosystem is a challenge. The team have put a lot of effort into backwards compatibility, but it’s a complex process and there are widespread doubts about how smoothly that will go.

Knowing this the WordPress development team have been distributing a WordPress Classic Editor plugin to allow sites to keep the old editor with the new version of WordPress.

My advice would be for anyone updating an existing WordPress site is to first install and activate this plugin, and to only use the new Gutenberg editor once they’ve been able to test it on a staging version of their website. Gutenberg may well work fantastically with your theme and plugins, but it’s far from guaranteed and you don’t want to be trying it out in production!


Using AWS Cloudfront with a Custom Domain and Free SSL

AWS Cloudfront is a CDN for delivering content to your users faster, by serving it from locations closer to them. It caches requests nearer to users and call pull the original content from its S3 service, or your own web server.

By default a Cloudfront distribution comes with an SSL enabled subdomain on the cloudfront.net domain name that looks something like this:


dlksg932809.cloudfront.net //default example
cdn.mikehealy.com.au //custom domain

You can also create a free SSL certificate through AWS for your own custom domain (or subdomain) and point that to your Cloudfront distribution. This is especially useful if you’re using Cloudfront to serve a static site in lieu of a conventional server.

Creating a Free, Custom SSL through AWS Certificate Manager

Go to AWS’ Certificate Manager product and choose ‘Request a certificate’.

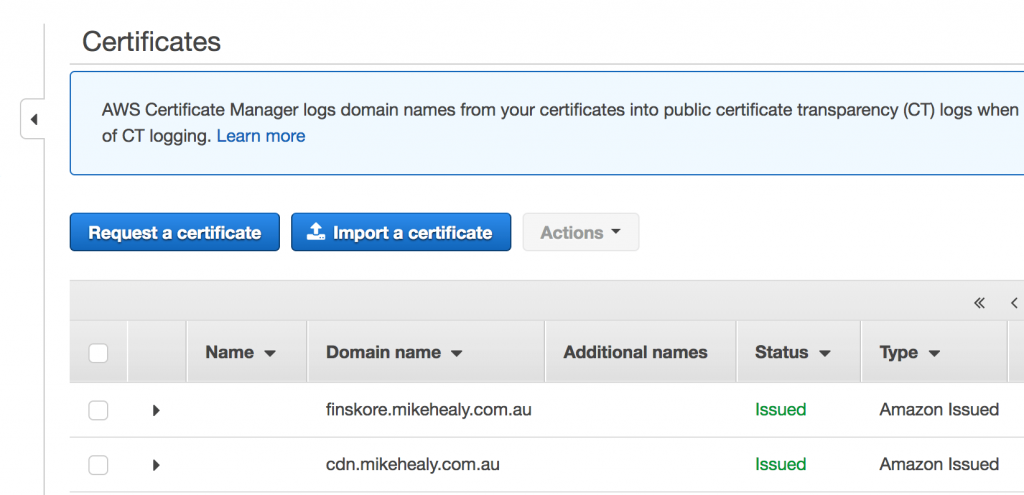
You’ll be asked to specify your domain (or subdomain) and which validation method to use.

DNS Validation

This method has you setting a CNAME record for the domain to prove that you have control of the domain. It’s the preferred method, however some DNS providers don’t support the characters required due to faulty validation rules, and so it might not be available to you.

Email Validation

This is the alternative method and requires you to have access to receive mail at a common admin email address such as administrator@example.com for your root domain.

The process after either creating your DNS CNAME or selecting email validation is essentially to follow the prompts and let AWS provision a new certificate for you.

Setting up your Cloudfront Distribution

Once your certificate has been created you can create your new distribution and select it as the SSL certificate to use. The other options for your distribution aren’t covered in this post, but you can now use your own (sub)domain to point to this distribution and your choice of S3 or your own web server to act as the origin server.

Provisioning the distribution takes a little while, usually more than 15 minutes in my experience.
Once that’s happened you’ll have a great, low cost static file serving distribution on your own domain with free SSL!

This is great for low-cost side projects or serving static files for your main website that would not otherwise justify setting up a web server and configuring Lets Encrypt, or having to purchase a traditional SSL certificate.

CDNs for WordPress

You can use a plugin (of course) to rewrite your content URLs so they are served off your CDN. This leaves the editing and publishing process unchanged. The plugin will handle converting local URLs to CDN versions.

As mentioned you have the choice of using your local web server, or S3 as the origin for your Cloudfront distribution. One advantage of moving your media off your WordPress site and onto S3 as the main store is that your local site install stays smaller and is therefore easier to move and backup.

Useful WordPress / S3 / CDN plugins

The Value of The Basic Design Components

I was recently involved late in the process of a web project. The design and development were all but complete with only last minute adjustments and fine tuning of new content required. The hard part of the design work had already been done. Getting the site completely finished though took longer than it should have because some basic parts of the design had broken down along the way.

Type Hierarchy & Spacing

The site in question had a very visually appealing design and most pages worked in isolation, but during the development process some consistency had been lost between various levels of the design hierarchy. Most pages had a top-level H1 heading, but not all; the H2s were usually a specific size, but not always. The spacing between a heading and the next element wasn’t always the same and the reasoning for the colour of a given element wasn’t always consistent. During the iterative refinement at the end of the project these pages were styled individually which caused them to break down as a group, requiring more rounds of refinement to unify them again.

There wasn’t a guiding principle for the size, colour and hierarchy of elements, so these decisions had to be made several times over–and for multiple pages–which added quite a bit of time to the process.

Design Groundwork

The type hierarchy and element spacing was not the sexy part of the design. It’s not something users would notice when it’s right, but the absence of that groundwork definitely made getting the to the final result more difficult.

The lesson for me was a reminder that the basic elements like spacing, alignment, repetition and consistency enable more interesting things and should be a guiding force later in the process when you’re short of time and needing to implement things quickly.

WordPress HTTP Error Uploading Larger Files

Sometimes WordPress shows a mysterious “HTTP Error” after attempting to upload a file. The file appears to upload with the progress sliders moving as normal, but fails at the end of the process without a descriptive error message.

There are a few possible causes of this, but if you have an Nginx server and small uploads are working while larger ones fail the problem might be Nginx’s max body size setting.

Increase Nginx’s client_max_body setting

Go to your Nginx sites-enabled directory (/etc/nginx/sites-enabled on Ubuntu systems) and update your server settings like so:

server {
   # other stuff is here too

   client_max_body_size 20M;
}

Restart Nginx.

The Design Conference 2017

The Design Conference#tdcbne17

2017 was my first year at The Design Conference, the creative brainchild of Matthew Haynes of Analogue Digital.

What a great event. Matt’s energy gets scaled up to Powerhouse proportions, mixed in with local & international speakers and blended with a big crowd and plenty of room for activities and the result was a really energizing atmosphere and a great experience.

The presenters spoke about a mix of their work, personal experiences, insights into their mindsets, creative & business processes, successes, failures and predictions.  The breakout talks gave practical advice and some hands on experience like the analogue illustration workshop with Sophia Mary Mac.

Some Takeaways

  • Wayne Thompson  — fonts are hard.
  • Dean Pool — practice creativity. Experiment. Have fun. Blend ideas.
  • Nadia Hernández — back yourself, have a go.
  • Mike Rigby — have reasons behind your work. Make 3D whales. Blow minds.
  • Kelly Thompson  — hone your craft, be adaptable.
  • Lauren Hom —  build off your personal projects. Listen to drunk ideas.
  • UsTwo Sydney — loved their transparency. Celebrate wins to push through the grind.
  • Prue Jones — the world is going to start changing faster. Get ready, and start planning that brain chip.
  • Cyrcle  — wow. Be fearless, go hard, ride the ups & downs, blow minds, make big things. Put a brush on a stick. (Kitters was there).

Seeing and hearing these stories made me want to get to work. An amazing event I’d highly recommend.

Laravel Eloquent gotcha using With and Find

The Eloquent ORM in Laravel makes it easy to pull in related models using the ::with() method.  It’s very useful and can solve the N+1 Query problem that can occur when accessing related models in a loop from the parents records.

<?php
$data = MyParentModel->with('ChildModel');

You’d commonly want to use this when accessing a particular parent model using the ::find() or ::findOrFail() method. The trap can be that with() must be called before findOrFail().

If you chain methods and call findOrFail() first it will be ignored and your result set will include all parent rows!

<?php
$data = MyParentModel->with('ChildModel')->findOrFail($parent_id);

Gravity Form Checkbox Values

This post is an extension of Gravity Forms – Collecting Select Box Value.
In this demo we are capturing the values from a group of checkboxes.

Demo with Checkboxes

    Select the items to add to your order
  • ...we'll grab the checkbox values here

/**
* Wrap our JS for capturing values
*/
var checkboxHandler = {
 
 	//Change these IDs to match your form
 	checkboxFieldId: 'input_5_3',  //checkbox container ID
	outputFieldId:   'input_5_2',    //hidden field to capture values
	
	checkboxField: null,
	outputField: null,
	
    /*
	Listen to Checkboxes
	---------------------- */
    init: function() {
    
		this.outputField = document.getElementById(this.outputFieldId);
		
		if( typeof this.outputField === 'undefined' || !this.outputField ) {
			console.error('Missing output field ' + this.outputFieldId);
			return;
		}
		
        this.checkboxField = document.getElementById(this.checkboxFieldId);
        if(typeof this.checkboxField === 'undefined' || !this.checkboxField) {
			console.error('Missing checkbox field ' + this.checkboxFieldId);
            return;
        }
         
        jQuery(this.checkboxField).on(
			'change',
			'input[type=checkbox]',
			{
				checkbox: this.checkboxField,
				output:   this.outputField
			},
			this.setValues
		);
    },
    
	
    /*
	Set text (or hidden) field to list of checkbox values
    ----------------------------------- */
    setValues: function(ev) {
	
		var fields = ev.data;
        var valueString = '';
		
		jQuery(fields.checkbox).find('input:checked').each( function(i){
			valueString += this.value + ', ';
		});
		
		fields.output.value = valueString.replace(/, $/, '');
    }
};

jQuery().ready( checkboxHandler.init() );

If you are using a child theme or custom theme you can add this code to its JavaScript file.
Otherwise use WordPress’ wp_register_script and wp_enqueue_script functions to load a new file.
The value of the hidden/text box can then be included in your Gravity Forms notification.