Gravity Forms – Collecting Select Box Value

Gravity Forms for WordPress has a select box field type, which by default uses the same data for both value and label. The field can easily be configured to have separate value and label attributes, however only the label will be sent in the form notification. In many cases this is fine, but sometimes you need the <option> value data to be sent as well as the display label.

Alternative Option: Capturing Checkbox Values

Capture the Value Attribute in a Hidden Field

One solution is to use JavaScript to capture the <select> field’s value, and copy it to a hidden form field which can be included in the email notification.

We’ll use a bit of custom JavaScript to listen to the <select> change event and update our hidden form field. This example code uses specific field ids that Gravity Forms generates. You could also write more general JS and selectors to match more scenarios if your site has multiple forms.

The Form Setup

At minimum we’ll need a select input (drop down) and a hidden field. For this demo our hidden field is actually plain text so we can see what’s happening.

Demo Product Form

  • Choose a product...
  • ...we'll grab the select option value here

Here’s the JavaScript. This example matches the IDs in the demo form. You’ll need to change those selectors to suit your form.

/**
* Wrap our JS for capturing values
*/
var selectHandler = {

	// Setup & Event listener
	// ----------------------
	init: function() {
		
		var select = jQuery('#input_3_1')[0]; //change id to match your form
		if(typeof select === 'undefined' || !select) {
			return;
		}
		
		//Set Initial Value (before change)
		selectHandler.setEmail.apply( {value: select.value} );
		
		jQuery(select).on('change', this.setEmail);
	},
	
	// Set text (or hidden) field to option value
	// (change selector to match your form)
	// ------------------------------------
	setEmail: function(ev) {
		 jQuery('#input_3_2')[0].value = this.value;
	}
};
jQuery().ready( selectHandler.init() );

If you are using a child theme or custom theme you can add this code to its JavaScript file.
Otherwise use WordPress’ wp_register_script and wp_enqueue_script functions to load a new file.
The value of the hidden/text box can then be included in your Gravity Forms notification.

WordPress Debugging

Bronson Quick spoke at the WordCamp Sunshine Coast today on debugging for WordPress. He covered techniques for fixing a white-screen of death as well as getting detailed information to sort out squirrelly bugs and performance issues.

Firstly WordPress has a few rad constants you can switch on to get better information about where things are breaking.

define( 'WP_DEBUG', true );     //I was blind, now I can see (my PHP errors)
define( 'WP_DEBUG_LOG', true ); //for production, write logs to wp-content
define( 'SCRIPT_DEBUG', true ); //use non-minified versions of core CSS/JS
define( 'SAVEQUERIES', true );  //log queries, look for suspicious ones. Not for production

Local Development

Develop in an environment close to the production hosting environment your site will be deployed to. The best way to do this is with virtual machines and tools like Vagrant.

Chassis is a WordPress focused VM for Vagrant. It’s configured with Nginx, MySQL, PHP 5.4 – 5.6 and has a bunch of handy extensions available to set up things like Xdebug, Debug Bar and Query Monitor quickly. The disposable nature of VMs means you can create one for each project.

Creating a Chassis VM

git clone git@github.com:Chassis/Chassis.git myproject
cd myproject
vagrant up

Chassis Extensions

Debug Bar gives you a lot of insight into what WordPress is doing to generate a page.

cd myproject/extensions
git clone https://github.com/Chassis/Debugging.git
vagrant provision

This will install a collection of Debug Bar plugins into WordPress en mass. What a time saver.

Query Monitor is an alternative tool for monitoring database activity in WordPress. It does more than monitoring SQL and can even show script dependencies, en queued styles and highlight errors.

So…

  • Develop in an environment similar to where you’ll deploy. Let Chassis set that up for you.
  • Use Xdebug, Debug Bar and Query Monitor as necessary to get insight into what your code is doing

WordPress Backups to AWS S3

Amazon Web Services S3 (Simple Storage Service) is a cheap and reliable way of storing data and is ideal for backups. Scheduling regular automatic backups of your WordPress website to S3 is pretty easy with a plugin, but it can be worth tweaking your AWS Credentials for better security.

This post will show you how to create a new user on your AWS account that has limited S3 permissions. It means if your site is ever compromised and the credentials stolen you’ll be in a far better position than having used your root AWS details! It’s also especially useful if you are managing backups of multiple client sites and do not want cross-access.

Step 1 – Create a new user with IAM in the AWS Console

  • Log into the AWS Console. Go to Services > Security & Identity > IAM
  • Create a new user (e.g. backup_myexample)
  • Copy and paste the Access Key and Secret somewhere; we’ll use those within WordPress shortly.

After creating your new user, go to their Policies and create a new inline policy. We’ll use inline, rather than group permissions so that each user you create (for backing up different websites) is isolated to their own S3 path.

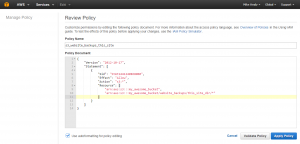
Give the policy a name and paste and modify this Policy Document. Change my_awesome_bucket and my_directory to the bucket and path you’re using for these backups.

{
  "Version": "2012-10-17",
  "Statement": [
  {
  "Sid": "Stmt1441240868000",
  "Effect": "Allow",
  "Action": "s3:*",
  "Resource": [
  "arn:aws:s3:::my_awesome_bucket",
  "arn:aws:s3:::my_awesome_bucket/website_backups/my_directory/*"
  ]
  }
  ]
}

Your screen should look a bit like this
AWS IAM Policy

Step 2 – Install & Configure BackWPUp

  • Log into your WP Dashboard, go to Plugins > Add New Plugin and search for BackWPUp
  • Install it and create a new job. For testing you may want to do Database backup only, or list of plugins. This is much faster that a full site (Files) backup. Once you know it’s working setup a full site backup.
  • Set the backup to S3 Service.
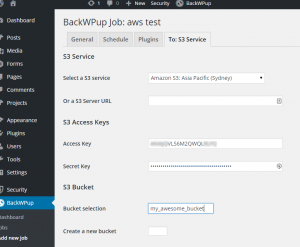
  • On the S3 Service page select your Region and paste in the Access Key and Secret key from before.
  • Type in your bucket name and path to store the backups. It should match the IAM Policy Document

s3-plugin-cfg

Save your settings and run the job.

The plugin logs will let you know if it worked.

A few notes

  • The IAM Policy allows all S3 actions on the given S3 path. I was not able to get this plugin to work with more restrictive permissions.
  • The new S3 Standard-IA class is good for these backups. The storage cost is cheaper than the Standard class without sacrificing redundancy as with Reduced Redundancy Storage. The downside is that downloads of these objects are more expensive.
  • Remember to check your backups periodically

wkhtmltopdf 0.12 on Ubuntu 14.04

The Problem

wkhtmltopdf is a library for rendering PDFs from HTML or live web pages.

  • apt-get install wkhtmltopdf  will install the older 0.9 version, which isn’t compatible with the Snappy PHP wrapper
  • wkhtmltopdf 0.9 is also unable to render on ‘headless’ operating systems and needs another package to simulate a display. The newer 0.12 version doesn’t have this problem.

The Solution

Manually Install the ‘Static’ Binary from wkhtmltopdf.org

(NB: If you’re not a root or super user most commands will need to be sudo…)

Download the Ubuntu “Trusty” build.
At the time of writing this is wkhtmltox-0.12.2.1_linux-trusty-amd64.deb

wget http://downloads.sourceforge.net/project/wkhtmltopdf/0.12.2.1/wkhtmltox-0.12.2.1_linux-trusty-amd64.deb

Rename it something easy to type like wkhtml.deb

Extract it with this command

ar x wkhtml.deb
# if ar not installed run this:
# apt-get install binutils

Extract the binary

tar xf data.tar.xz

Move the binary file to /usr/bin

mv wkhtmltopdf /usr/bin/wkhtmltopdf

Now PDF Rendering Should Work

wkhtmltopdf http://example.com myTest.pdf

Laravel 5 Environment Config

Laravel 4 used a function that checked the servers hostname to determine the environment. Laravel 5 simplifies environment detection by having a .env file present in your project root.

.env.example is ignored by Laravel’s detection. You can fill it with the keys your application expects to act an an example for your own file.

.env is for the current environment

Add .env to your .gitignore file. It’s got to stay out of your repo so you don’t overwrite it each time you pull.
Copy/Rename .env.example to .env for each environment.

set the APP_ENV value within your .env file to tell Laravel where it’s running.

APP_ENV=local
APP_DEBUG=true
APP_KEY=123abc...
$app->environment(); //get the current environment
if($app->environment('local', 'staging')) { }  //test if local or staging env

You can retrieve your .env config values with the env() function.


$cfgValue = env('MY_SWEETAS_VARIABLE');

Don’t Host Your Email with your Website

When you get a new website and you’ve registered a shiny new domain name it makes sense to also have a good looking email address to go with it. Advertising with an email like bills_plumbing245@bigpond.com.au looks a lot less professional than masterplumber@billsplumbing.com.au !

Just about all web hosting accounts come with the ability to host mail too. Creating an inbox this way using your own domain is cheap and easy, but it’s not the best way.

Limitations of using your web hosting for email

Server Space

Whenever you get mail it’s stored on a server. If you’re piggy backing on your web hosting you’ll have to choose between using up your hosting disk space allowance with accumulated mail; or configuring Outlook to delete mail off the server after it’s been downloaded. Deleting from the server solves the full account issue, but it means your local computer and a single hard drive become the single source of all your mail. Transferring it can be a hassle if you get a new device and there’s a serious risk of data loss.

Synchronization

The standard POP3 web hosting approach to mail is very limited. If you send a message from your desktop PC it only exists there. You won’t be able to find that message in the sent items of your phone or tablet or laptop. You can partially work around this by using an IMAP account, which keeps a copy of everything on the server and syncs between devices, but you run straight back into the problem of server disk space above.

Reliability

Most web hosts are pretty good at keeping your files around. Many will take weekly off-server backups too. But given how important email is for many businesses this may not be enough. Downtime can be a big problem if it affects your mail and a week old backup may be too old.

Dedicated Email Hosting

The solution to these issues is to use a robust system designed for email. If you consider the importance of business email and the cost of downtime it’s well worth it.

There are a few good options including:

  • Google Apps for Work — essentially Gmail and the Google Apps suite using your own domain name. You can use the Gmail web interface, or Outlook. You can connect from any device. There’s powerful search and its fast.
  • Office 365 – Some Microsoft Office subscriptions include access to Office 365 which is a cloud hosted service designed to fix these issues.
  • Exchange Server — for larger business it may make sense to run your own Exchange server. This is an advanced approach that requires IT support.
  • Hosted Exchange Account — like an Exchange server, except you outsource the hosting and pay on a per-account basis.

Any of these approaches will solve the issues of web hosting based email.
I recommend Google Apps for Work. It’s around $50/year per user – a small price for the benefits.

Get in touch with me if you need help configuring your domain name and setting up a hosted email solution

Google Apps Referral

If you want to use Google for Work consider using my referral link: https://goo.gl/j6dgdR

Beauty vs Bandwidth

Some visual flair, a bit of bold imagery and a beautiful custom font or two can be great ways of making your website enticing. Those elements bring trade offs though in the form of increased page weight and load time.

The great thing about a website is that it can be accessed anywhere, from a bucketload of different devices. It’s also a challenge because you don’t know what context your users are coming from.

Those design enhancements that delight someone in their office could be a source of frustration when your page loads slowly when they’re out and in a hurry. It is possible to detect devices and remove some of the unnecessary, heavier items from the page, but this approach isn’t perfect. An iPhone struggling to hold onto a 3G connection is a different beast from one connected to a good WiFi connection; so knowing what sort of device your user is on is only part of the story.

It’s important to consider everything added to the page as having pros and cons. Being too stingy with the page weight could lead to a boring design. Being too fast and free with image sliders, video and graphics could come back to bite you when a busy user on a bad connection gets frustrated and leaves.

The design needs to balance these needs.

Web Hosting: VPS vs Shared

Everyone prefers a fast website. Even a few extra seconds spent loading each page can be a drag on your visitors attention. While there are a lot of factors that determine a website’s loading speed I recently ran a test of different web hosting environments on my own site.

The defacto hosting standard for many WordPress sites is a cPanel account on shared web hosting. This setup is ubiquitous and easy to manage. One alternative is a Virtual Private Server (VPS) with SSD storage. The trade off is that a VPS requires more knowledge to setup and manage, but the performance can be a big step up.

I ran a test, running this WordPress 4.0 website on reasonable (i.e. not bottom dollar) shared hosting account and a Vultr VPS with 768mb RAM and SSD storage and monitored response times.

Website Details

basic WordPress 4.0 site, without page caching. The VPS was running Apache 2.4 and the shared hosting on Litespeed HTTP.

Results

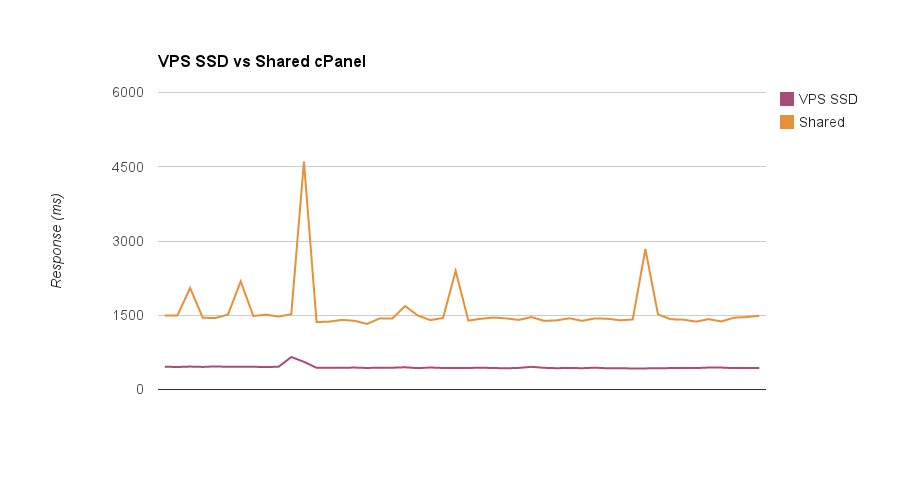
(Lower is better. Both servers are in Sydney and response time measured from the US)

VPS vs Shared hosting response

  • Shared Hosting: averaged 1583 ms with the slowest measured peak at 4602 ms
  • VPS SSD Hosting: averaged 448 ms with a slow peak of only 656 ms

The result was noticeably snappier pages on the VPS. The other take away is the consistency. On a shared server your response times can vary depending on what other sites on the server are doing. The VPS which has isolated resources gave far more consistent performance.


Detecting Environment in Laravel 4

Update: How to Get Environment in Laravel 5

Your PHP application should have different settings for its development and production environments. Here’s how you can set your Laravel 4 app to detect the environment, load the appropriate settings and keep installation-specific things like database credentials out of your Git repo.

Detecting The Environment

Laravel lets you provide arrays of hostnames it will check the server against to determine the environment.

Open bootstrap/start.php

$env = $app->detectEnvironment([
   'local' => ['MyMachineName', 'AnotherDevMachine'],
   'staging' => ['StagingEnvName']
]);

If unsure, use PHP’s gethostname() function to find your machine names.
This is the value to use inside the local/staging arrays

Laravel will default to ‘production’ if no other environment is matched.


Setting Environment Config Values

Laravel looks for .env.*.php files in the root directory (beside your composer.json and .gitignore files).

You will want to exclude these files from your Git repo. Add the following lines to your .gitignore

.env.*.php
.env.php

Then create an env file for each of your environments. Use .env.php for the production environment.
They should look something like this:

<?php

/**
 * Local Development
 */
 return array(
	'app.env'		=> 'dev',
	'app.debug'		=> true,
	'app.url'		=> 'http://example.dev',

	'mysql.host'	 => '127.0.0.1',
	'mysql.database' => 'bestDbEva',
	'mysql.username' => 'me',
	'mysql.password' => 'myTremendousPassword'

 );

The actual values are up to you. You can store whatever values you need within the application.

Using The Environment Values

Laravel config can now call getenv() to get the dynamic environment variable. For your DB config open app/config/database.php

'mysql' => array(
	'driver'    => 'mysql',
	'host'      => getenv('mysql.host'),
	'database'  => getenv('mysql.database'),
	'username'  => getenv('mysql.username'),
	'password'  => getenv('mysql.password'),
	'charset'   => 'utf8',
	'collation' => 'utf8_unicode_ci',
	'prefix'    => '',
),

Can I Update My Own Website?

Customers come to your website looking for information and of course information changes. So it’s natural for site owners to want to be able to maintain their own sites, saving the delay and cost of having a designer make minor changes. Visitors also tend to respond favourably to a website which is “alive” and kept up to date. “Will I be able to update the site myself?” is a very common question to ask.

The answer generally is yes and there are a few steps involved in making that happen.

Developing a website on a Content Management System (CMS) makes updates easy for non-technical users. A CMS provides site owners with a private administration area they can log into to control site content. Implementing a CMS is a very common requirement, but it does add a little work to the process compared to a ‘static’ site, which is just a collection of HTML files. Supporting a CMS means that the design you and your designer come up with needs to be coded as a theme which ties the front end templates (HTML and CSS) to the CMS features.

Content Management System Options

There are a lot of options out there, but a few CMS are occupying the lions share of the market now. Some common choices are:

  • WordPress
  • A Custom Built Solution
  • Concrete5
  • Joomla
  • Drupal

There are also ecommerce focused systems such as WooCommerce (an extension of WordPress), Lemon Stand and Magento.

WordPress has been the fastest growing and mostly widely used option for a few years now and is my go-to option for most new sites. It’s easy to use and has a critical mass of usage and development that makes it hard to ignore. WordPress has grown out of its origins as a blogging system and now supports pages and custom content types (e.g. products, services, offices, etc.).

There’s a rich eco-system of plugins, themes and developers for WordPress and it has a very well implemented updates system.

A custom built solution may also be appropriate in some cases, but they would be the minority. One advantage of a custom system would be a very easy learning curve for the site owners as there’d be no extraneous features in the result.

Knowing your Content

For some websites the site structure will be a series of simple pages that owners can edit through a basic editor (a text area similar to Microsoft Word or Google Docs) in the site’s backend. Often times though your business will have a little more structure to your content and the CMS can be improved with a little development work to better match the nature of your information.

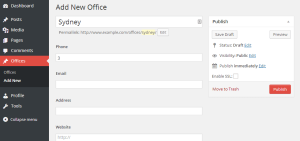
For example if your business had offices in six locations, each with a phone number, primary email and street address (with corresponding map) you could simply type that information into a standard page. The solution would work, but it’d be difficult for those maintaining the site to keep the formatting consistent. Structuring the phone numbers and maps in the correct way would be tedious. A better approach would be to create what’s called a “Custom Post Type” for Offices during the site’s development. Users would then have dedicated form fields for those pieces of information and the templates created by the designer would be responsible for maintaining a consistent design. This approach reduces the work involved in keeping the site up to date, and makes the office data available for other users (e.g. listing all offices in a footer or sidebar automatically).

Here’s how that might look to site editors in WordPress:

WordPress Custom Post Type

Training

The training requirements for staff to use a system like WordPress are pretty minimal; usually under an hour. It’s often a matter of resizing images to a sensible scale before uploading and knowing where to find the screens you need.

The extra time taken to develop your site on top of a CMS like WordPress or even programming a simple custom system for your business can be worthwhile. Site owners usually enjoy the flexibility of being able to make changes to their own site whenever they want without having to email and pay their designer to do it. The ease of maintenance can also mean more frequent updates which only helps you to get more value out of your website.